Building User-Friendly Web Apps

Building a web app isn’t just about features. It’s about how users interact with it. A good app should feel natural, predictable, and easy to use. Small usability improvements often make a big difference in how people experience your product.


Navigation Enhancements

Make Pages Easy to Bookmark

Update the URL to reflect the current state when users search, filter, or view specific content. This allows them to return to the same place without repeating steps.

  • Example:

    • Before: User searches for “Vehicle XYZ”
    • After: khalil232.com/someapp/search?query=Vehicle+XYZ

This saves time and makes your app feel more reliable.

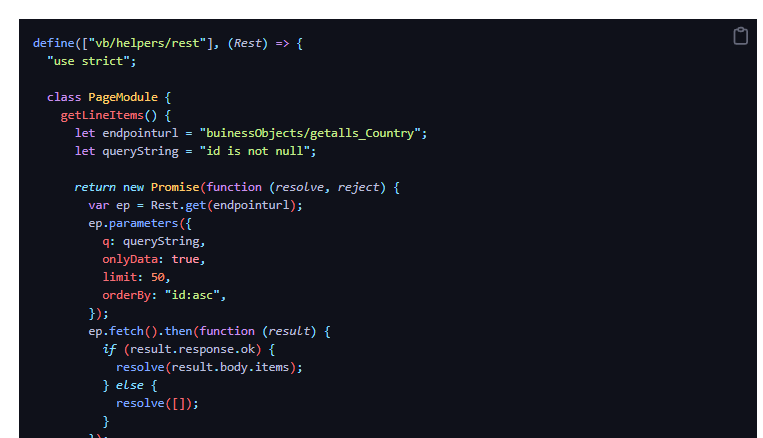
Support Deep Linking

Allow users to open specific records, sections, or screens directly using a URL. This avoids repetitive navigation.

  • Example:

    • khalil232.com/someapp/vehicle/12345

Deep linking is especially useful in business apps where users frequently revisit or share specific records.

Respect User Actions

Avoid Restricting Basic Functionalities

Do not block basic browser actions like cut, copy, or paste. Users expect these to work everywhere.

  • Avoid:

    • Disabling right-click
    • Preventing text selection

Blocking these actions creates frustration and breaks normal user behavior.

Non-Blocking Processes

Do vs Don't blocking ui example

Reduce Blocking Actions

Full-screen loaders and blocking overlays interrupt users and slow them down. Instead, allow them to continue working.

  • Better approaches:

    • Run tasks in the background
    • Keep screens interactive
    • Show completion using notifications or toasts

Example

While generating a report, let users continue using the app. Notify them when the report is ready to download.

This keeps the app responsive and efficient.

Visual Clarity

Make Links Visually Distinct

Do vs Don't link example

Links should clearly look clickable. Use color, underline, or icons to differentiate them from normal text.

  • Example:

    • Blue, underlined text for links

Clear visual cues improve navigation and reduce confusion.

Confirm Difficult Actions

Always confirm actions that cannot be undone, such as deleting data.

Delete popup example

  • Example:

    • “This action will permanently delete your record. Do you want to continue?”

This prevents mistakes and gives users confidence.

Data Management

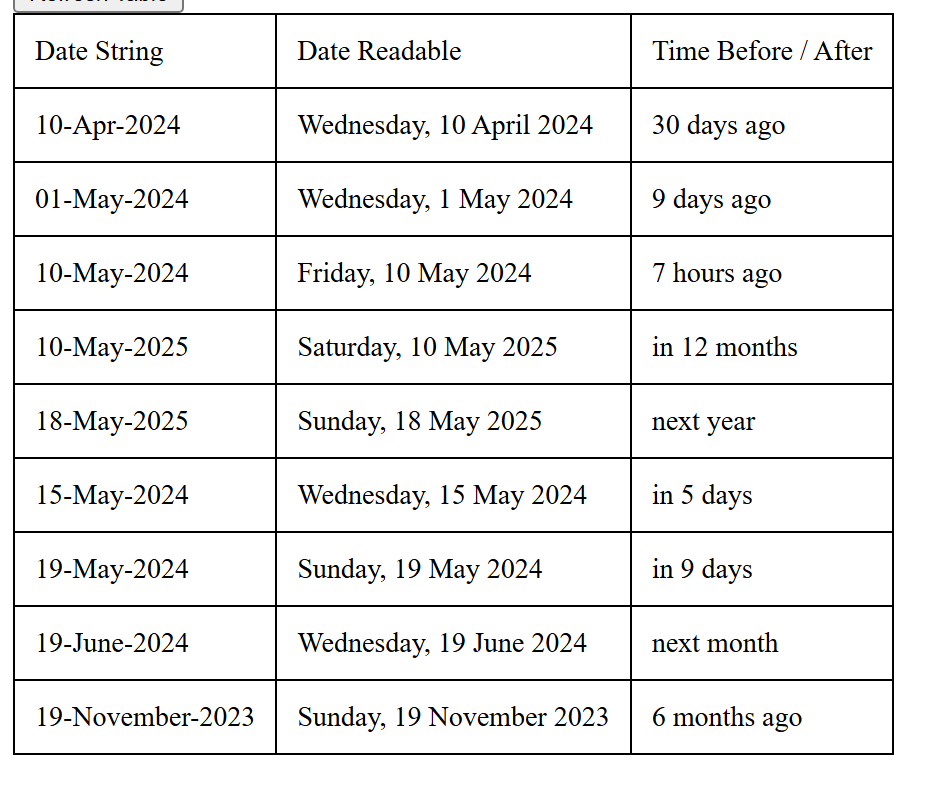
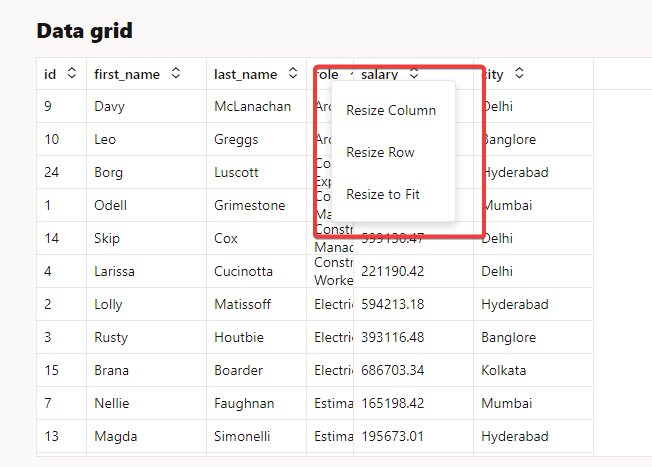
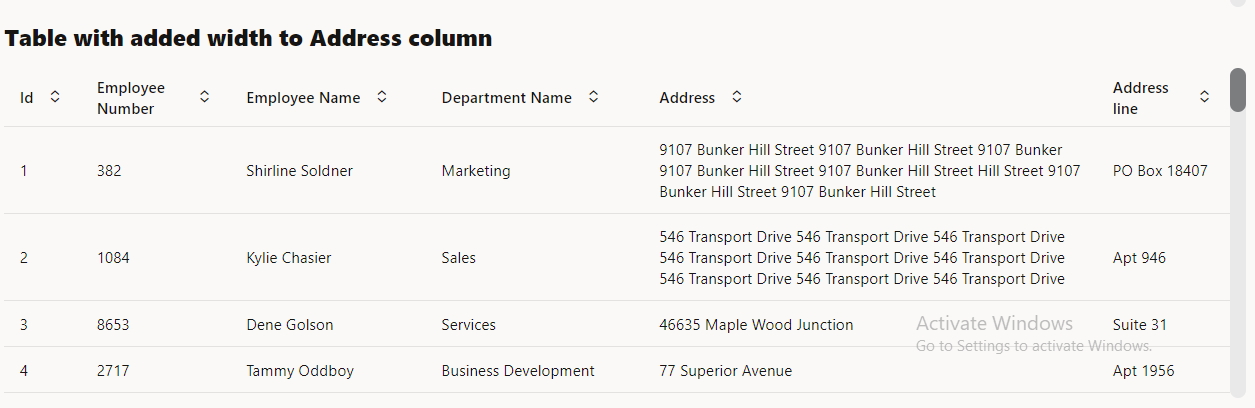
Manage Text Length in Tables or Lists

Long text can break layouts and reduce readability. Handle it properly.

  • Recommended:

    • Truncate long text
    • Add “Read More” options
    • Use tooltips or modals for full content

This keeps the UI clean without hiding important information.


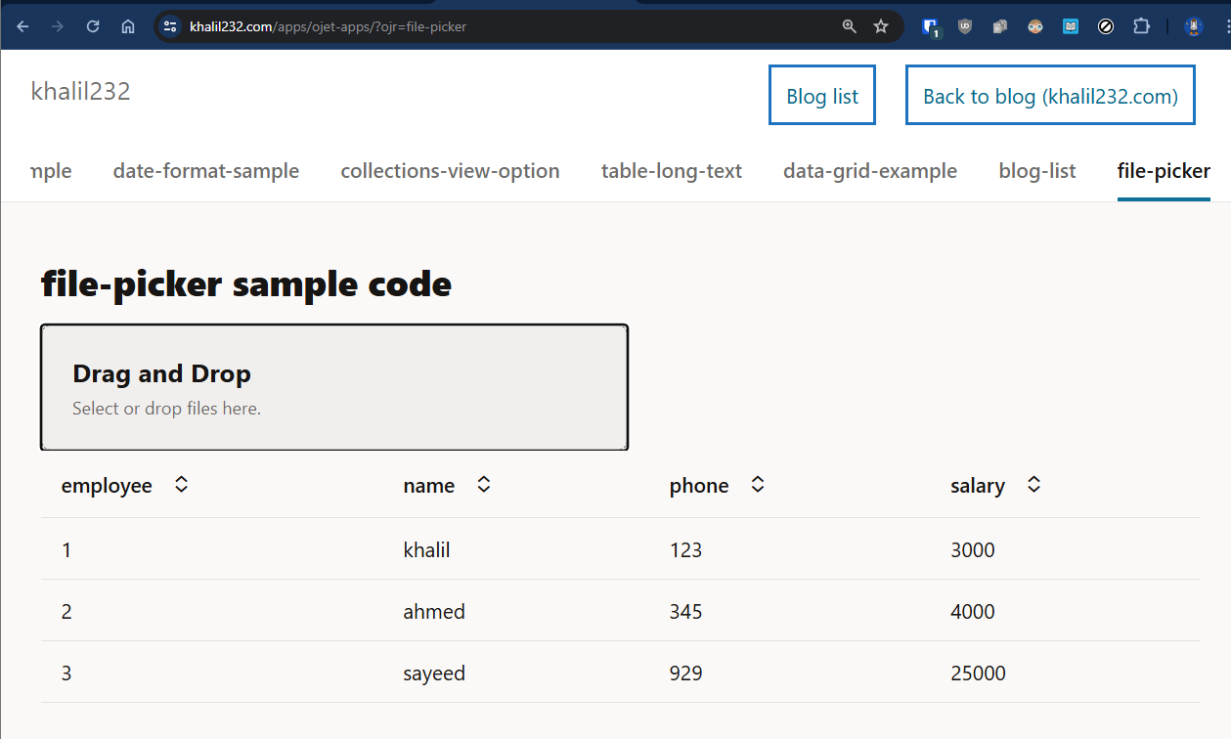
File Upload Previews

Do vs Don't File Upload example

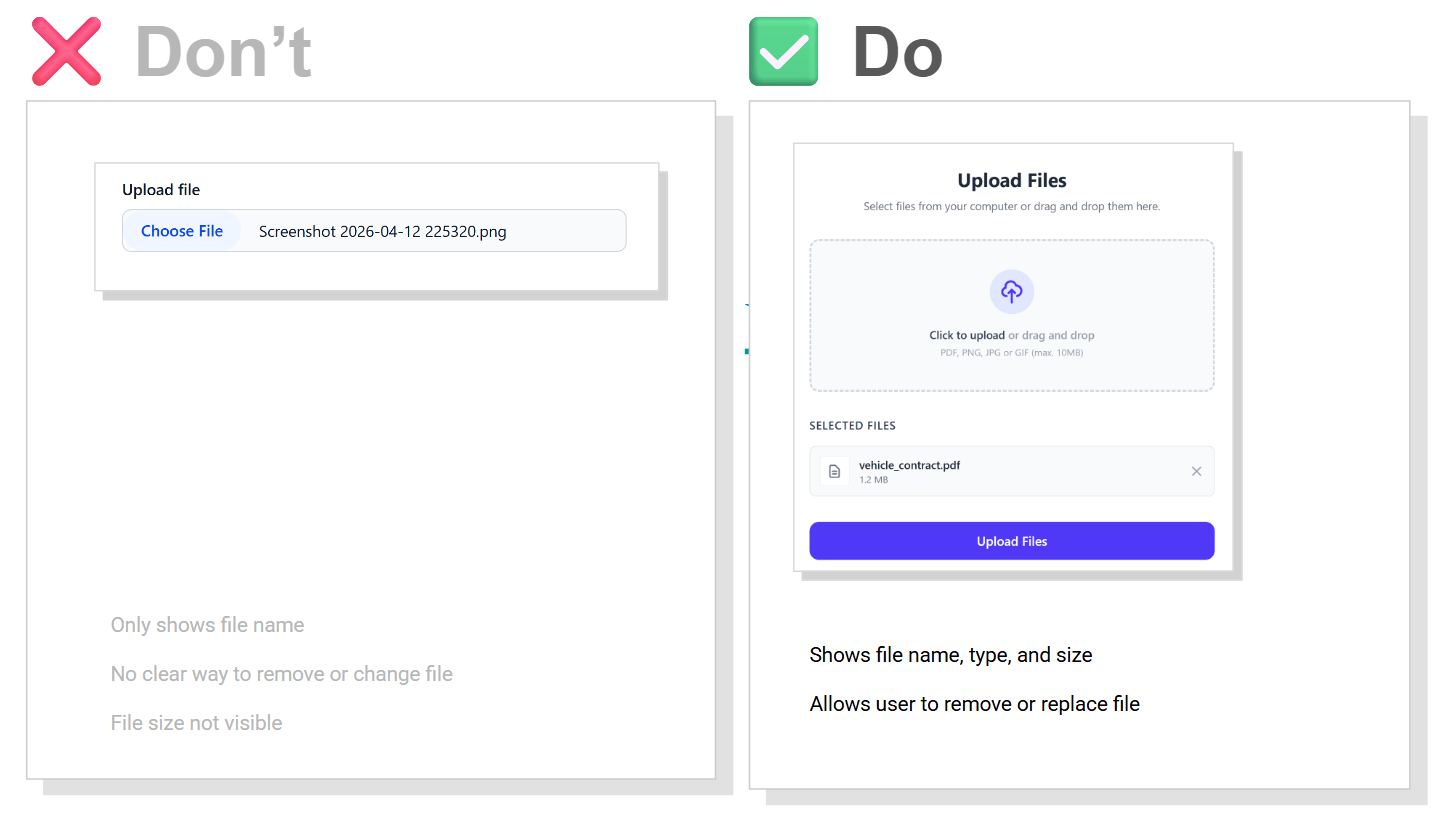
Show a preview before users submit uploaded files. Include key details.

  • Display:

    • File name
    • File size
    • File type

Users should be able to remove or replace files easily before submitting.

Conclusion

User-friendly apps are built through small, thoughtful decisions.

Making navigation easier, avoiding unnecessary restrictions, and keeping the interface responsive all contribute to a better experience. These improvements may seem minor, but they significantly reduce user frustration and make your app more enjoyable to use.

Make VBCS application migration easier

These are some general tips for a VBCS developer to make changes in VBCS application before migrating to different instances.

Use connections based on backend. Instead of directly using a URL,

This way, when we migrate from one instance to another, we can make changes in backend URL and credentials. This will be one-time setup when me get a new instance and at code level, we don’t have to make many changes

Get Application URL using JS function

For any kind of link to different VBCS application, use JavaScript code to get application URL using

$application.path
// design url -- {{vbcs-cloud-url}}/ic/builder/design/khalil/1.0.0/preview/webApps/demo/
// live url -- {{vbcs-cloud-url}}/ic/builder/rt/khalil/live/webApps/demo/ 

Get SaaS URL using JS function

For any kind of link to different ERP instance for any deep link or report link to get the host name of SaaS application, configure the SaaS application as one of the backend and configure a get API

Using the get API, we can use the below JavaScript code to get full URL of API, from which we can extract the exact host name

Code sample for getting SaaS URL using Rest Helper

define(["vb/helpers/rest"], (Rest) => {
  "use strict";

  class PageModule {
    async getSaaSURL(arg1, arg2) {

      let apiURL = await Rest.get("jsonplaceholderTypicodeCom/getUsers").toUrl();

      // jsonplaceholderTypicodeCom --> this is service name
      // you can find this under Service Connections --> Overview --> Connection name 

      // getUsers --> this is endpoint name 
      // in above tab --> select endpoint and This is endpoint id 
      
      let hostName = new URL(apiURL).origin;

      console.log(apiURL); // https://jsonplaceholder.typicode.com/users
      console.log(hostName); // https://jsonplaceholder.typicode.com/
    }
  }

  return PageModule;
});

Use messages or static status like APPROVED, DONE, or some ID like -1, 0, 1, or 2024 using a constant value at the application level.

This will help to easily see all the values at one time and later, if there is change in actual value, we can change the value at this place with no need to change the code.

{
  "id": "demo",
  "description": "A new VB app",
  "defaultPage": "shell",
  "constants": {
    "SUCCESS_STATUS": {
      "type": "string",
      "defaultValue": "Successfully Created"
    }
  }
}
define(["vb/helpers/rest"], (Rest) => {
  "use strict";

  class PageModule {
    async checkStatus(status, APP_SUCCESS_STATUS) {
     // pass $application.constants.SUCCESS_STATUS
      return ( status === APP_SUCCESS_STATUS )
    }
  }

  return PageModule;
});

Getting time difference from now

Intro

Working with raw timestamps is not user-friendly.

Instead of showing dates like “2024-05-10 10:15:43”,
we can display them in a more readable way:

– 5 minutes ago
– 2 days ago
– in 3 months

This is called relative time formatting.

Example Ouput

let us say today is 15-Apr-2026 and we send the input date string, the api will return date readable

Input Date StringDate ReadableTime Before / After
10-Apr-2025Thursday, 10 April 2025last year
20-May-2025Tuesday, 20 May 202511 months ago
10-Mar-2026Tuesday, 10 March 2026last month
20-Mar-2026Friday, 20 March 202626 days ago
10-Apr-2026Friday, 10 April 20265 days ago
22-Apr-2026Wednesday, 22 April 2026in 7 days
10-May-2026Sunday, 10 May 2026in 25 days
20-May-2026Wednesday, 20 May 2026next month
10-Apr-2027Saturday, 10 April 2027in 12 months
20-Apr-2027Tuesday, 20 April 2027next year

Try it yourself

Enter any date and see how it converts into relative time.

How it works

We calculate the difference between the current time and the given date.

Then we convert that difference into units like seconds, minutes, hours, days, months, or years.

Finally, we format it into readable text like “2 hours ago” or “in 5 days”.

Code Example

function getTimeAgo(dateStr) {
  const relativeTime = new RelativeTime(); // defaults to OS localen  
  let dateObj = new Date(dateStr); 
  return relativeTime.from(dateObj);
}

We can use JavaScript to convert a date into a readable relative time format.

For example, “2024-05-10T01:25:14.317Z” is less readable than “7 hours ago”.

I have used the relative-time library to simplify this conversion:
https://github.com/yairEO/relative-time

Full code available here:
https://github.com/khalilahmed232/khalilahmed232/tree/main/plain/date-time-ago

This makes date display much more user-friendly in real applications.

Using relative time formatting makes applications feel more modern and user-friendly, especially for feeds, comments, and activity logs.

To upload csv data as ADP(Array data provider) or array

Steps to upload csv data as ADP(Array data provider) or array

  • Add a file component
  • On file select call the below JavaScript function and pass file as parameter
  • Assign the result from below function to ADP.data or Array

JavaScript function

PageModule.prototype.getRowsFromCsv = function (file) {
  return new Promise((resolve) => {
    try {
      let fileContent = [];
      const fileReader = new FileReader();
      fileReader.readAsText(file);
      fileReader.onload = (e) => {
        let result = e.target.result;
        let columns = ['employee','name','phone','salary'];
        let size;
        let inputData = [];
        if (result) {
          let lines = result.split("\n");
          for ( let  i = 1 ; i < lines.length ; i++ ) {
            let row = lines[i];
            let rowArray = row.split(",");
            let inputObj = {} ;
            inputObj.employee = rowArray[0];
            inputObj.name = rowArray[1];
            inputObj.phone = rowArray[2];
            inputObj.salary= rowArray[3];
            inputData.push(inputObj);
          }
          resolve({
            success: true,
            inputData: inputData,
            error: ""
          });
        } else {
          resolve({
            success: false,
            inputData: [],
            error: "Empty File : " + result
          });
        }
      };
    } catch (err) {
      resolve({
        success: false,
        inputData: [],
        error: "Error while reading file : " + err.detail
      });
    }
  });
};

Sample CSV data that will work with this code

employee,name,phone,salary
1,khalil,123,3000
2,ahmed,345,4000
3,sayeed,929,25000

Sample file picker html code

<div class="oj-sm-padding-0 oj-md-padding-4x">
    <h4>file-picker sample code</h4>

    <oj-file-picker on-oj-select="[[ fileSelectListener ]]">

    </oj-file-picker>


    <oj-table class="custom-table" id="employeetable" scroll-policy="loadMoreOnScroll"
        class="oj-flex-item oj-sm-12 oj-md-12" data="[[ employeeADP ]]" columns='[
    {"headerText":"employee","field":"employee"},
    {"headerText":"name","field":"name"},
    {"headerText":"phone","field":"phone"},
    {"headerText":"salary","field":"salary"}
    ]'>
    </oj-table>

</div>

Sample working code — iframe

Link to live demo — file-picker

Format dates in VBCS page using functions

You can use oj-input-date or oj-input-date-time components for showing formatted date and use convertor options

But when using above component only for read-only purpose to show some values in grid or table, it doesn’t make sense to use input fields.

Instead we can use oj-bind-text field and pass data using following JavaScript function.

The JavaScript function will add necessary formatting to the date and return the value as string.

Live code preview

We can use date convertor functions to format the date in required format

JavaScript function

define(["ojs/ojconverter-datetime"], (datetimeConverter) => {
  "use strict";

  class PageModule {
    convertDateToStr(customDate) {
        let dateConvertor = new datetimeConverter.IntlDateTimeConverter({
          pattern: "dd-MMM-yyyy",
        });
      return dateConvertor.format(customDate);
    }
  }

  return PageModule;
});

Patterns examples

Patterns Input – date stringOutput – formatted date
dd-MMM-yyyy2024-01-18T13:59:23+05:3018-Jan-2024
dd-MM-yyyy2024-01-18T13:59:23+05:3018-01-2024
MM/dd/yyyy2024-01-18T13:59:23+05:3001/18/2024
MM/dd/yyyy hh:mm:ss2024-01-18T13:59:23+05:3001/18/2024 01:59:23
MM/dd/yyyy hh:mm:ss a2024-01-18T13:59:23+05:3001/18/2024 01:59:23 PM

References –

jsDoc for IntlDateTimeConverter ( to view all convertor options )

https://www.oracle.com/webfolder/technetwork/jet/jsdocs/oj.IntlDateTimeConverter.html

Live application URL ( to try out few configs )

https://khalil232.com/apps/ojet-apps/?ojr=date-format-sample

How to have different colors on rows based on one field in row in oj-data-grid

On a data grid, we can use a function in the cell.class-name attribute to dynamically pass the class name based on row data.

cellContext” will contain the required information. We can use console.log() to identify the structure.

This can be used for other attributes, like “header.column.class-name” as well on oj-data-grid

This can be used when we want show different style for different rows, like

  • If we want to highlight top performer in a data set,
  • or differently show calculated fields
  • or if we want to show different type with a different color

Sample HTML code:

<div class="oj-flex">
  <div class="oj-flex-item oj-sm-12 ">
    <h5>Data grid</h5>
    <oj-data-grid id="datagrid" style="width:100%;height:400px" aria-label="My Data Grid" 
      data='{{ salaryDataADP }}'
      header.column.style="[[ headerColStyle ]]" header.column.resizable.width="enable"
      header.column.resizable.height="enable" header.row.resizable.width="enable"     
      header.row.resizable.height="enable"
      header.column.class-name="oj-helper-justify-content-flex-start" 
      cell.class-name="[[ cellClassNameFunc ]]"
      cell.style="width: 200px;">     
    </oj-data-grid>
  </div>
</div>

Sample JS code:

this.cellClassNameFunc = function (cellContext) {
  let cellRowIndex = cellContext.indexes.row;
  let classNameStr = "oj-helper-justify-content ";
  
  // to do styling based on index 
  // if (cellRowIndex % 3 === 0) {
  //   classNameStr += "oj-bg-success-10 oj-text-color-success";
  // } else if (cellRowIndex % 3 === 1) {
  //   classNameStr += "oj-bg-danger-30	 oj-text-color-danger";
  // } else {
  //   classNameStr += "oj-bg-warning-30 oj-text-color-warning";
  // }
  
  let key = cellContext.key;
  console.log(cellContext);
  console.log(cellContext.datasource.data[cellRowIndex]);
  let rowData = cellContext.datasource.data.find((x) => x.id === key);
  if (rowData.city === "Delhi" || rowData.city === "Banglore") {
    classNameStr += "oj-bg-success-10 oj-text-color-success";
  } else if (rowData.city === "Hyderabad" || rowData.city === "Kolkata") {
    classNameStr += "oj-bg-danger-30	 oj-text-color-danger";
  } else if (rowData.city === "Mumbai" || rowData.city === "Nagpur") {
    classNameStr += "oj-bg-warning-30 oj-text-color-warning";
  }
  
  cellContext.datasource[cellRowIndex];
  
  return classNameStr;
};

Screenshots

Choosing row background color and text color based on city

Choosing row background color and text color based on index

Live application URL ( row style based on city ): https://khalil232.com/apps/ojet-apps/?ojr=data-grid-example

References:

Datagrid js doc for identifying other attributes : https://www.oracle.com/webfolder/technetwork/jet/jsdocs/oj.ojDataGrid.html

CSS helpers used:

Background-color: https://www.oracle.com/webfolder/technetwork/jet/jsdocs/BackgroundColor.html

Font color: https://www.oracle.com/webfolder/technetwork/jet/jsdocs/Text.html

How to enable resize in oj-data-grid

We can enable resize in oj-data-grid by adding the following html code to <oj-data-grid>:

<oj-data-grid
  id="datagrid"
  style="width:100%;height:400px"
  aria-label="My Data Grid"
  data='{{ salaryDataADP }}'
  header.column.style="[[ headerColStyle ]]"
  header.column.resizable.width="enable"
  header.column.resizable.height="enable"
  header.row.resizable.width="enable"
  header.row.resizable.height="enable"
  header.column.class-name="oj-helper-justify-content-flex-start"
  cell.class-name="oj-helper-justify-content-flex-start"
>
  <oj-menu slot="contextMenu" aria-label="Employee Edit">
    <oj-option id="resizeWidth" value="Resize Width"
      data-oj-command="oj-datagrid-resizeWidth"></oj-option>
    <oj-option id="resizeHeight" value="Resize Height"
      data-oj-command="oj-datagrid-resizeHeight"></oj-option>
    <oj-option id="resizeFitToContent" value="Resize Fit To Content"
      data-oj-command="oj-datagrid-resizeFitToContent"></oj-option>
  </oj-menu>
</oj-data-grid>

The following attributes on the header will allow resizing. When hovering on a border, the user can resize the row or column height or width.

<oj-data-grid
  header.column.resizable.width="enable"
  header.column.resizable.height="enable"
  header.row.resizable.width="enable"
  header.row.resizable.height="enable"
>
</oj-data-grid>

To add an additional right-click menu, we can add the below code. The user can right-click and click on Resize width, and enter a desired width, like 100 or 200.

<oj-menu slot="contextMenu" aria-label="Employee Edit">
    <oj-option id="resizeWidth" value="Resize Width"
      data-oj-command="oj-datagrid-resizeWidth"></oj-option>
    <oj-option id="resizeHeight" value="Resize Height"
      data-oj-command="oj-datagrid-resizeHeight"></oj-option>
    <oj-option id="resizeFitToContent" value="Resize Fit To Content"
      data-oj-command="oj-datagrid-resizeFitToContent"></oj-option>
  </oj-menu>

There are other commands available, like below ( see the jsdoc link for more information ). Few features are supported only in latest version of JET

Default Functiondata-oj-command value
Resize menu (contains width and height resize)oj-datagrid-resize
Sort Row menu (contains ascending and descending sort)oj-datagrid-sortRow
Sort Column menu (contains ascending and descending sort)oj-datagrid-sortCol
Resize Widthoj-datagrid-resizeWidth
Resize Heightoj-datagrid-resizeHeight
Resize Fit To Contentoj-datagrid-resizeFitToContent
Sort Row Ascendingoj-datagrid-sortRowAsc
Sort Row Descendingoj-datagrid-sortRowDsc
Sort Column Ascendingoj-datagrid-sortColAsc
Sort Column Descendingoj-datagrid-sortColDsc
Cut (for reordering)oj-datagrid-cut
Paste (for reordering)oj-datagrid-paste
CutCells (for data transferring)oj-datagrid-cutCells
CopyCells (for data transferring)oj-datagrid-copyCells
PasteCells (for data transferring)oj-datagrid-pasteCells
Filloj-datagrid-fillCells
Select Multiple Cells on Touch Deviceoj-datagrid-discontiguousSelection
Freeze Columnsoj-datagrid-freezeCol
Freeze Rowsoj-datagrid-freezeRow
Unfreeze Columnsoj-datagrid-unfreezeColumn
Unfreeze Rowsoj-datagrid-unfreezeRow
Hide Columnsoj-datagrid-hideCol
Unhide Columnsoj-datagrid-unhideCol

Screenshots

Live application URL: https://khalil232.com/apps/ojet-apps/?ojr=data-grid-example

References:

helper classes: https://www.oracle.com/webfolder/technetwork/jet/jsdocs/Helpers.html

jet cookbook: https://www.oracle.com/webfolder/technetwork/jet/jetCookbook.html?component=dataGrid&demo=resizing

link for oj-data-commands: https://www.oracle.com/webfolder/technetwork/jet/jsdocs/oj.ojDataGrid.html#contextmenu-section

How to refresh particular cell in oj-data-grid

We can use the update event to refresh particular grid cells.

Let us say we are displaying a grid with few rows where the user can edit the data and we are showing few calculated fields (like total or percentage). If we have to refresh the grid cells after updating the cell with the correct value, we can use the following JavaScript code:

// "gridData" is a variable holding grid information. 
// We can pass "gridData" to the JS function and call the below code.

let updateEventDetails = {
"type": "update",
"detail": {
    "ranges": [{
            "rowOffset": 0,      // start of grid row
            "columnOffset": 0,   // start of grid col
            "rowCount":  gridData.counts.row // end of grid row
            "columnCount": gridData.counts.column // end of grid col 
       }]
    }
};
gridData.dispatchEvent(updateEventDetails);

The above code will refresh all the grid cells; if we want to refresh only a particular grid cell, we can set relative rowOffset, columnOffset, rowCount or columnCount.

We can also give multiple ranges if the cells cannot be captured in a single range.

When we use the refresh event on the grid, the grid becomes white and renders again. In order to avoid that, we use the update event. The update event doesn’t remove the focus, and only the cells in range will get refreshed.

If you have a huge amount of data in the grid, use the update event very rarely. It has a huge impact on performance. If you want a large number of cells to be refreshed, use the refresh event instead of the update event.

References:

Data Grid Cookbook: https://www.oracle.com/webfolder/technetwork/jet/jetCookbook.html?component=dataGrid&demo=overView

ojDataGrid JS doc: https://www.oracle.com/webfolder/technetwork/jet/jsdocs/oj.ojDataGrid.html

DataGridProviderUpdateEvent: https://www.oracle.com/webfolder/technetwork/jet/jsdocs/DataGridProviderUpdateEvent.html

Calling Rest API using JavaScript function in vbcs

We can call rest API configured in service connection using RestHelper

The function getLineItems() can be called using action chain.

define(["vb/helpers/rest"], (Rest) => {
  "use strict";

  class PageModule {
    getLineItems() {
      let endpointurl = "buinessObjects/getalls_Country";
      let queryString = "id is not null";

      return new Promise(function (resolve, reject) {
        var ep = Rest.get(endpointurl);
        ep.parameters({
          q: queryString,
          onlyData: true,
          limit: 50,
          orderBy: "id:asc",
        });
        ep.fetch().then(function (result) {
          if (result.response.ok) {
            resolve(result.body.items);
          } else {
            resolve([]);
          }
        });
      });
    }
  }

  return PageModule;
});

We can call the rest API configured in the service connection using Rest Helper in APP UI as well

We have to additional pass extensionId – site_MyExtension. ( id of the APP UI extension.

You can find the extension id from ->

  • Open workspace, click on extension name in left hand side
  • Go to settings and you will find extension id.
define(["vb/helpers/rest"], (Rest) => {
  "use strict";

  class PageModule {
    getLineItems() {
      let extensionId = "site_MyExtension"
    
      let endpointurl = "site_MyExtension:saasRestApi/getalls_Country";
      let queryString = "id is not null";
 
      return new Promise(function (resolve, reject) {
        var ep = Rest.get(endpointurl, { extensionId: "site_MyExtension" } );
        ep.parameters({
          q: queryString,
          onlyData: true,
          limit: 50,
          orderBy: "id:asc",
        });
        ep.fetch().then(function (result) {
          if (result.response.ok) {
            resolve(result.body.items);
          } else {
            resolve([]);
          }
        });
      });
    }
  }

  return PageModule;
});

How to handle large text in table or grid

By default long text in table or data-grid will expand, showing all text in single line, that may not be very useful.

Columns will get expanded and few columns which we want to show will be hidden.

<oj-table class="custom-table" 
  id="employeetable"
  scroll-policy="loadMoreOnScroll" 
  class="oj-flex-item oj-sm-12 oj-md-12"
  data="[[ employeeListADP ]]" 
  columns='[
            {"headerText":"Id","field":"id"},
            {"headerText":"Employee Number","field":"empNumber"},
            {"headerText":"Employee Name","field":"empName"},
            {"headerText":"Department Name","field":"departmentNumber"},
            {"headerText":"Address","field":"address"},
            {"headerText":"Address line","field":"addressLine2"}
        ]'>
  </oj-table>

We can set for the column, so that it doesn’t expand.

e.g.: In this for Address we can give max-width as 200px

This will show the text up to 200px and later it is show as … This is similar to text-overflow: ellipsis; css code

<oj-table class="custom-table" 
    id="employeetable"
    scroll-policy="loadMoreOnScroll"
    class="oj-flex-item oj-sm-12 oj-md-12"
    data="[[ employeeListADP ]]" 
    columns='[
      {"headerText":"Id","field":"id"},
      {"headerText":"Employee Number","field":"empNumber"},
      {"headerText":"Employee Name","field":"empName"},
      {"headerText":"Department Name","field":"departmentNumber"},
      {"headerText":"Address","field":"address","style": "max-width:200px"},
      {"headerText":"Address line","field":"addressLine2"}
    ]'>
</oj-table>

We can try to wrap the text using oj-helper-overflow-wrap-anywhere oj-helper-white-space-normal classes

<h5>Table with added width to Address column</h5>
<oj-table class="custom-table"  
    id="employeetable"  
    scroll-policy="loadMoreOnScroll" 
    class="oj-flex-item oj-sm-12 oj-md-12"
    data="[[ employeeListADP ]]" 
    columns='[
        {"headerText":"Id","field":"id"},
        {"headerText":"Employee Number","field":"empNumber"},
        {"headerText":"Employee Name","field":"empName"},
        {"headerText":"Department Name","field":"departmentNumber"},
        {  
            "headerText":"Address",
            "field":"address",
            "className": "oj-helper-overflow-wrap-anywhere oj-helper-white-space-normal"
        },
        {"headerText":"Address line","field":"addressLine2"}
    ]'>
</oj-table>

Link to live application – https://khalil232.com/apps/ojet-apps/?ojr=table-long-text

Link for text-overflow: ellipsishttps://developer.mozilla.org/en-US/docs/Web/CSS/text-overflow

Link for oradocs for content wrap – https://www.oracle.com/webfolder/technetwork/jet/jetCookbook.html?component=table&demo=columnContentWrapping