Blogs

How to handle large text in table or grid

By default long text in table or data-grid will expand, showing all text in single line, that may not be very useful.

Columns will get expanded and few columns which we want to show will be hidden.

<oj-table class="custom-table" 
  id="employeetable"
  scroll-policy="loadMoreOnScroll" 
  class="oj-flex-item oj-sm-12 oj-md-12"
  data="[[ employeeListADP ]]" 
  columns='[
            {"headerText":"Id","field":"id"},
            {"headerText":"Employee Number","field":"empNumber"},
            {"headerText":"Employee Name","field":"empName"},
            {"headerText":"Department Name","field":"departmentNumber"},
            {"headerText":"Address","field":"address"},
            {"headerText":"Address line","field":"addressLine2"}
        ]'>
  </oj-table>

We can set for the column, so that it doesn’t expand.

e.g.: In this for Address we can give max-width as 200px

This will show the text up to 200px and later it is show as … This is similar to text-overflow: ellipsis; css code

<oj-table class="custom-table" 
    id="employeetable"
    scroll-policy="loadMoreOnScroll"
    class="oj-flex-item oj-sm-12 oj-md-12"
    data="[[ employeeListADP ]]" 
    columns='[
      {"headerText":"Id","field":"id"},
      {"headerText":"Employee Number","field":"empNumber"},
      {"headerText":"Employee Name","field":"empName"},
      {"headerText":"Department Name","field":"departmentNumber"},
      {"headerText":"Address","field":"address","style": "max-width:200px"},
      {"headerText":"Address line","field":"addressLine2"}
    ]'>
</oj-table>

We can try to wrap the text using oj-helper-overflow-wrap-anywhere oj-helper-white-space-normal classes

<h5>Table with added width to Address column</h5>
<oj-table class="custom-table"  
    id="employeetable"  
    scroll-policy="loadMoreOnScroll" 
    class="oj-flex-item oj-sm-12 oj-md-12"
    data="[[ employeeListADP ]]" 
    columns='[
        {"headerText":"Id","field":"id"},
        {"headerText":"Employee Number","field":"empNumber"},
        {"headerText":"Employee Name","field":"empName"},
        {"headerText":"Department Name","field":"departmentNumber"},
        {  
            "headerText":"Address",
            "field":"address",
            "className": "oj-helper-overflow-wrap-anywhere oj-helper-white-space-normal"
        },
        {"headerText":"Address line","field":"addressLine2"}
    ]'>
</oj-table>

Link to live application – https://khalil232.com/apps/ojet-apps/?ojr=table-long-text

Link for text-overflow: ellipsishttps://developer.mozilla.org/en-US/docs/Web/CSS/text-overflow

Link for oradocs for content wrap – https://www.oracle.com/webfolder/technetwork/jet/jetCookbook.html?component=table&demo=columnContentWrapping

When to use grid or table or for each in VBCS

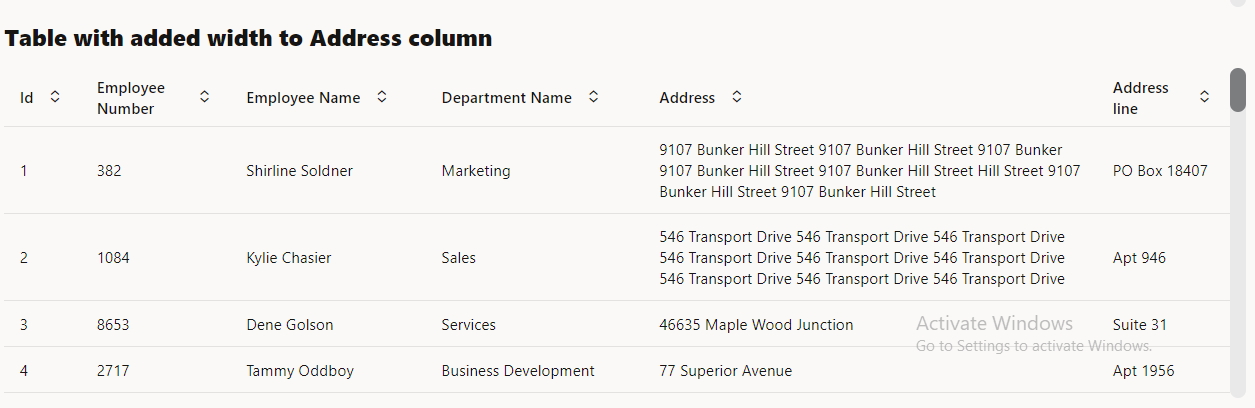
While showing collections, we can use oj-table or oj-data-grid or we can use oj-for-each to display multiple values

When we show some data which comes in API, and we don’t have to much grouping and all we can show as table

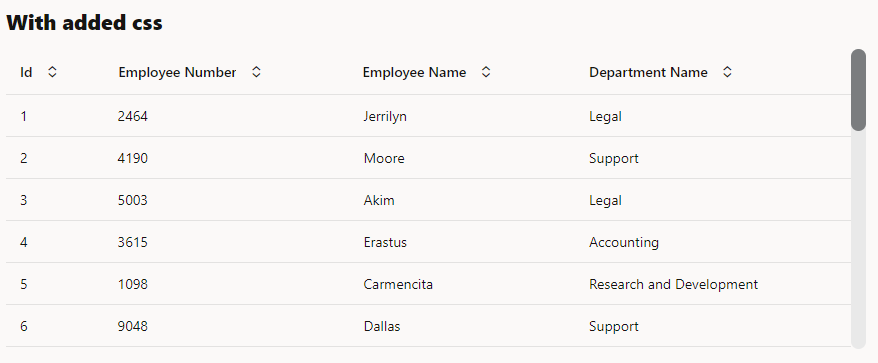
If the data has few actions like approve or to update few columns like Quantity or Price or has some links to open in a page to view some more data or link to download some data we can use table

When we want to have a screen with large amount of data, where user will add multiple rows, edit like a excel instead of table we can use data grid. Data grid has better edit support than editable table. It is easy to handle edit events on data grid.

If we want to show summary based on some columns, like we are showing crick players information like number of sixes or total number of runs scored or total wickets taken per team, we can have player records and team records to show total. This will be better achieved with grid.

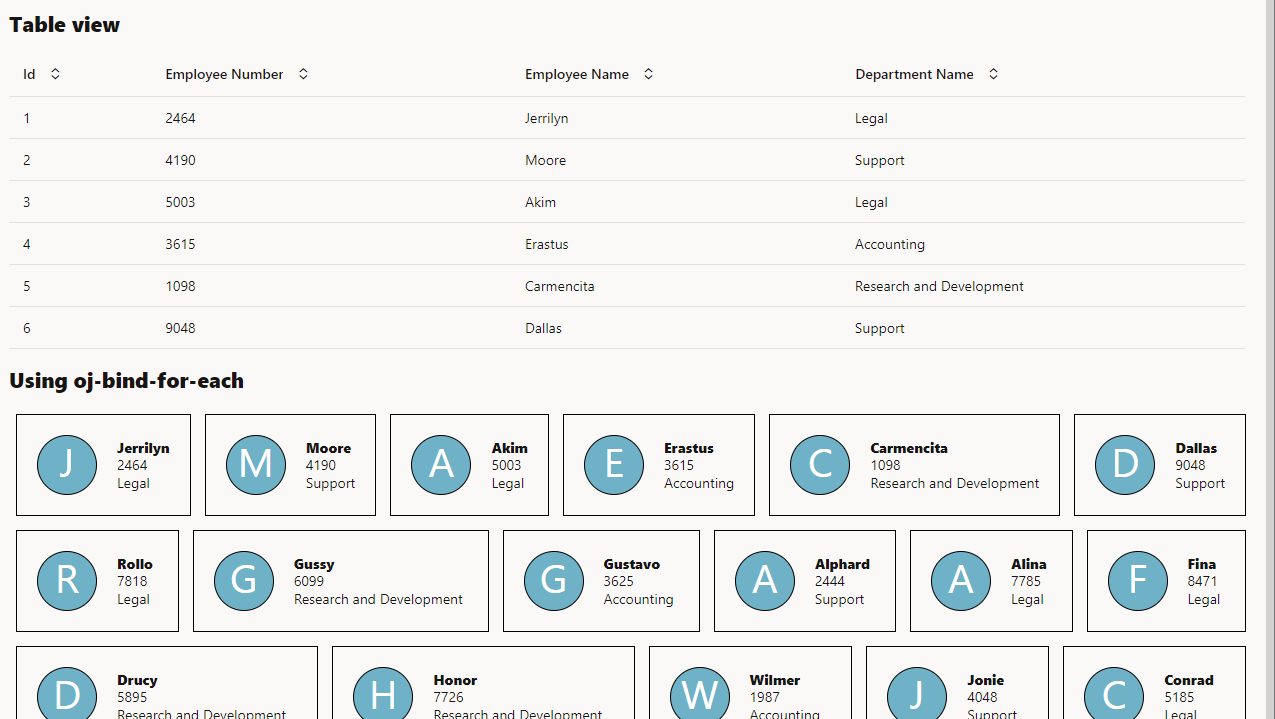
If we want to show People like data with images or some products like shirts, cars or something else where having a different look and feel, than table helps.

We can also provide option to change the view from table to grid to for-each

e.g.:

live link – https://khalil232.com/apps/ojet-apps/?ojr=collections-view-option

Format number in VBCS page using functions

You can use oj-input-number tag for showing formatted number and use convertor options

But when using above component only for read-only purpose to show some values in grid or table, it doesn’t make sense to use input fields.

Instead we can use oj-bind-text field and pass data using following javascript function.

The JavaScript function will add necessary formatting to the number and return the value as string.

We can use number convertor functions to format the number in required format

Live code preview

JavaScript function

define(["ojs/ojconverter-number"], (numberConverter) => {
  "use strict";

  class PageModule {
    convertNumberToStr(amount) {
      var numberConvertor = new numberConverter.IntlNumberConverter({
        maximumFractionDigits: 2,
        useGrouping: true,
        currency: "USD",
        currencyDisplay: "symbol",
        style: "currency",
      });

      return numberConvertor.format(amount.rate);
    }
  }

  return PageModule;
});

Config options

Field nameField valueInputOutput
maximumFractionDigits 224599.44249424599.44
024599.44249424599
useGrouping true 1232459912,324,599
false 1232459912324599
currency USD12324599$12,324,599.00
INR12324599₹12,324,599.00
EUR12324599€12,324,599.00
currencyDisplay symbol12324599USD 12,324,599
code 12324599$12,324,599
name 1232459912,324,599 US Dollar
style percent 0.769576.95%
currency 12324599$12,324,599.38
decimal 12324599.383812324599.38

Commonly used config options

to show currency amount like $12,324,599.38 or €12,324,599.38

{
  "maximumFractionDigits": 2,
  "useGrouping": true,
  "currency": "USD",
  "currencyDisplay": "symbol",
  "style": "currency",
}

to show percentage like 60% or 80.4%

{
  "maximumFractionDigits": 2,
  "useGrouping": false,
  "style": "percent",
}

to show whole number values

{
  "maximumFractionDigits": 0,
  "useGrouping": true,
  "style": "decimal"
}

References –

oj-input-number convertor related code

https://www.oracle.com/webfolder/technetwork/jet/jetCookbook.html?component=inputNumber&demo=inputNumberConverter#

jsDoc for IntlNumberConverter ( to view all convertor options like useGrouping, currency )

https://www.oracle.com/webfolder/technetwork/jet/jsdocs/oj.IntlNumberConverter.html

Live application URL ( to try out few configs )

https://khalil232.com/apps/ojet-apps/?ojr=number-format-sample

Validations in groovy for business object

We can write simple or complex validations at business objects level in groovy

  • In some cases we want to check if age > 18.
  • In some case we want to check for the object row the status is approved then no changes should happen.
  • In some cases we want to allow only the same user to edit the record.
  • In some case we want to validate using some external API ( to check availability of quantity or price ).

For all these we can use validations using groovy.

General idea is to create a object function using groovy to validate and use this object function in before insert trigger or before update trigger.

Let us say we have a Business Object Employee with fields (id, first name, last name, age) and we want to have validation that age should be at least 18 years.

Object function code.

if ( age < 18 ) {
  throw new oracle.jbo.ValidationException('Age should not be less than 18');
}

Let us say we have a Business Object ApprovalBO with fields (id, approval name, status {draft, created, pending approval, rejected, approved} ) and we want to restrict user to not edit any data once the record status is set to approved or rejected.

def origStatus = getOriginalAttributeValue('status')
if ( origStatus == 'Approved' || origStatus == 'Rejected' ) {
  throw new oracle.jbo.ValidationException('Changes not allowed for this record as status is ' + origStatus);
}

Let us say we have a Business Object Transaction with fields (id, transaction name, created by, updated by) and we want to have validation that only created by user can update the value of record.

def secCtx = adf.context.getSecurityContext()
def user = secCtx.getUserName()

if ( createdBy != user ) {
  throw new oracle.jbo.ValidationException('Only created user can update the record');
}

Let us say we have a Business Object Inventory with fields (id, inventory name, quantity, price) and we want to have validation against a external api. We can configure the external api using service connections. We can make rest call in groovy and validate against it.

def priceSvc = newService('priceService');
def responseObj = priceSvc.getQuantityAndPrice();
def quantityApi = responseObj.quantity;
def priceApi = responseObj.price;

if ( quantity > quantityApi ) {
  throw new oracle.jbo.ValidationException('Quantity entered is greater that avalible quantity from api (' + quantityApi + ')');
}

if ( price > priceApi ) {
  throw new oracle.jbo.ValidationException('Price entered is greater that avalible price from api (' + priceApi  + ')');
}

Reference – https://docs.oracle.com/en/cloud/paas/integration-cloud/visual-developer/trigger-rules-business-objects-1.html

https://docs.oracle.com/en/cloud/paas/app-builder-cloud/visual-builder-groovy/groovy-tips-and-techniques.html#groovy-tips-and-techniques

How to rename file in MFT

In MFT, when file is moved from source to transfer, we can rename the file.

This will be useful in scenarios when the file name is different than what is expected

Sometime during decryption the extension is lost, we can add a different extension

Sometimes we have to append a source to handle files from different sources differently

We can use RenameRegExp to rename the file

This uses same method as java replace. The input is Regular expression

Common use cases and examples

to completely rename the file –

String sourceRegExp = "([A-Za-z0-9_]+)([A-Za-z0-9.]*)";
String targetRegExp = "input_file.csv";
Input Output
ABC_SOME_BIG_FILE_NAME.csvinput_file.csv
ABC_SOME_OTHER_FILE_NAME.csvinput_file.csv
SOME_FILE_NAME_WITHOUT_EXTENSIONinput_file.csv

To completely change the extension

String sourceRegExp = "([A-Za-z0-9_]+)([A-Za-z0-9.]*)";
String targetRegExp = "$1.csv";
InputOutput
some_data_1.txt some_data_1.csv
some_data_2.dat some_data_2.csv
some_data_3. some_data_3.csv
some_data_4.txt.pgp some_data_4.csv
some_data_5.txt.gpg some_data_5.csv
some_data_6.csv some_data_6.csv
some_data_7 some_data_7.csv

To add a prefix to the file name.

String sourceRegExp = "([A-Za-z0-9_.]+)";
String targetRegExp = "source_$1";
InputOutput
some_data_1.txt source_some_data_1.txt
some_data_2.dat source_some_data_2.dat
some_data_3. source_some_data_3.
some_data_4.txt.pgp source_some_data_4.txt.pgp
some_data_5.txt.gpg source_some_data_5.txt.gpg
some_data_6.csv source_some_data_6.csv
some_data_7 source_some_data_7

Sample Java code to test regular expression if the input / output is as expected:

public class RenameString {
    public static void main(String[] args){

        TestCase[] testCases  = new TestCase[7];
      
        testCases[0] = new TestCase("some_data.txt", "some_data.csv");
        testCases[1] = new TestCase("some_data.dat", "some_data.csv");
        testCases[2] = new TestCase("some_data.", "some_data.csv");
        testCases[3] = new TestCase("some_data.txt.pgp", "some_data.csv");
        testCases[4] = new TestCase("some_data.txt.gpg", "some_data.csv");
        testCases[5] = new TestCase("some_data.csv", "some_data.csv");
        testCases[6] = new TestCase("some_data", "some_data.csv");
    
        for ( TestCase t : testCases) {
            String output = renameFileNameExtension(t.inputStr);

            System.out.print(t.inputStr + " --- " + t.expectedOutputStr + " --- " + output + " --- " );

            if ( output.equals(t.expectedOutputStr) ) {
                System.out.println("success");
            }
            else {
                System.out.println("failed");
            }
        }
    }

    public static String renameFileNameExtension(String inputStr) {
        
        String sourceRegExp = "([A-Za-z0-9_]+)([A-Za-z0-9.]*)";
        String targetRegExp = "$1.csv";

        String output = inputStr.replaceAll(sourceRegExp, targetRegExp);

        return output;
    }

}

class TestCase {
    String inputStr;
    String expectedOutputStr;

    TestCase(String inputStr, String expectedOutputStr){
        this.inputStr = inputStr;
        this.expectedOutputStr = expectedOutputStr;
    }
}

You can test Regular expression using this website https://regex101.com/ and selecting Java language.

Delete all rows from business object using groovy in vbcs

Users can navigate to Business Objects ( BO ) -> Objects -> Select Object ( ex: Department or Employee ) -> Business Rules -> Object Function -> New Object Function

In Object function we can write groovy code to do operations

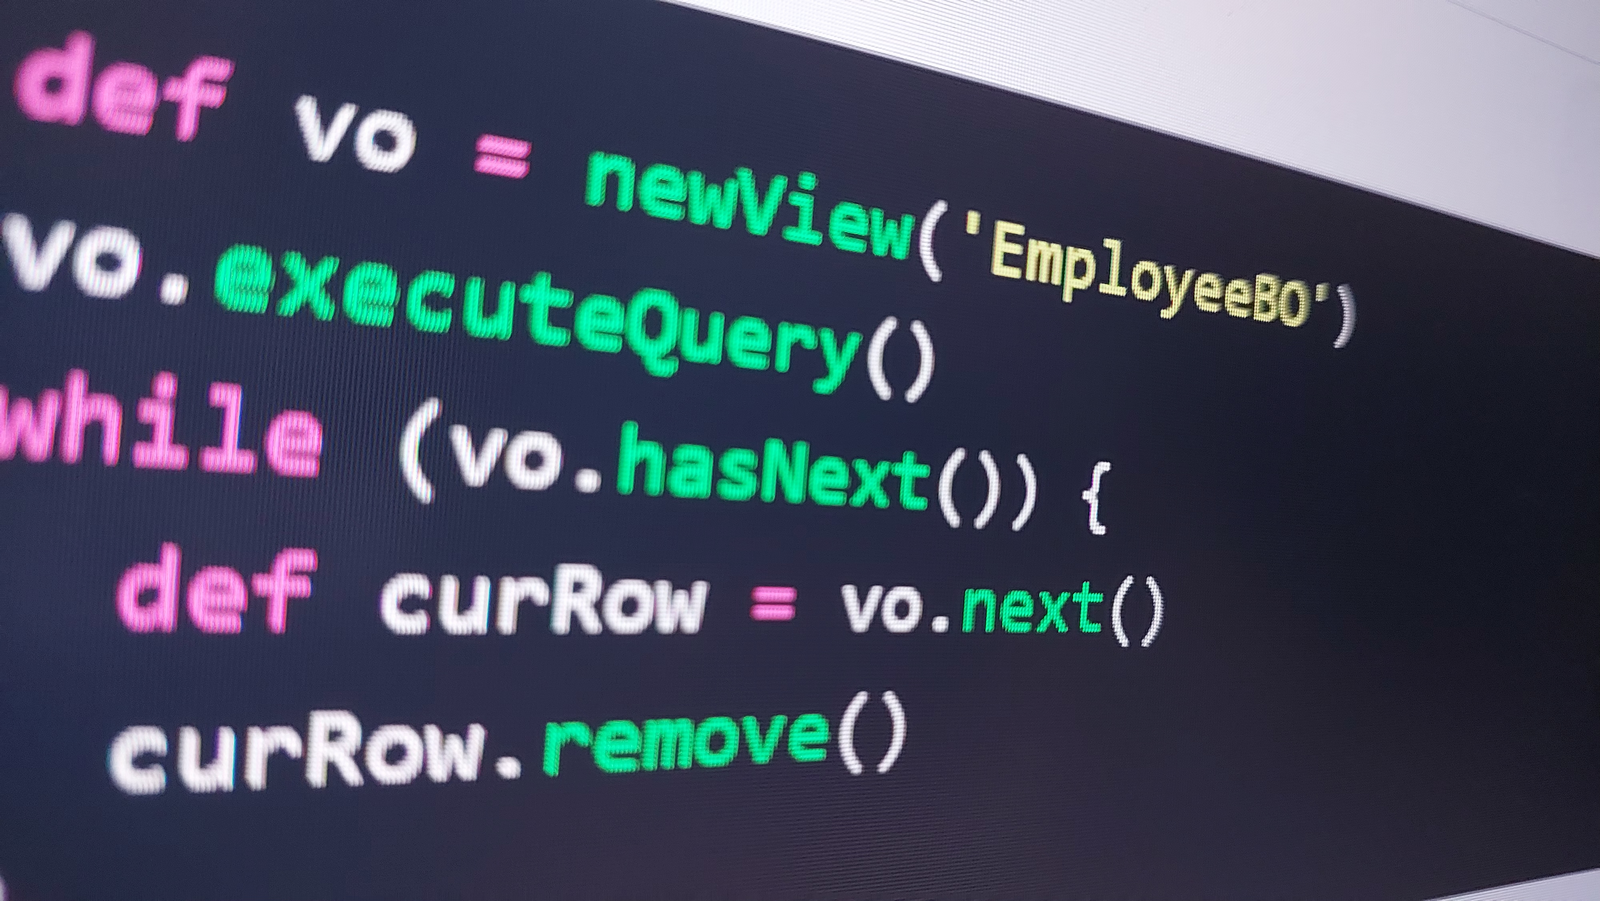
Groovy code to delete all rows in business object

The following code will fetch all the data from a particular BO and delete it.

def vo = newView('EmployeeBO')
vo.executeQuery()
while (vo.hasNext()) {
  def curRow = vo.next()
  curRow.remove()
}

We can write this code in a separate Business object object function and call it using rest API.

This will be useful in scenarios where we want to delete large amount of data. Instead of calling delete API for each BO we can call the above object function to delete multiple records in one API call.

We can also customize this code by adding query to vo like below

def vo = newView('EmployeeBO')
vo.appendViewCriteria("Salary between 50000 and 75000")
vo.executeQuery()
while (vo.hasNext()) {
  def curRow = vo.next()
  curRow.remove()
}

or by checking some logic using groovy like below

def vo = newView('EmployeeBO')
vo.executeQuery()
while (vo.hasNext()) {
  def curRow = vo.next()
  if ( curRow.Salary >= 5000 && curRow.Salary <= 75000 ) {
    curRow.remove()
  }
}

You can find more code on groovy capabilities from the following reference.

https://docs.oracle.com/en/cloud/paas/app-builder-cloud/visual-builder-groovy/groovy-tips-and-techniques.html#groovy-tips-and-techniques

How to make scroll bar thicker in vbcs table or gird

Update 01-Feb-2025 02:54 AM use this code instead

#employeetable > * {
  scrollbar-width: auto;
}

Based on the default redwood theme the table and grid scoll bar are very thin

User can update it by adding the following code in app.css in vbcs application.

#employeetable::-webkit-scrollbar-track {
  border-radius: 15px;
  background-color: #e9e9e9;
  border-radius: 15px;
}

#employeetable ::-webkit-scrollbar {
  width: 15px;
  height: 15px;
  background-color: #e9e9e9;
  border-radius: 15px;
}
#employeetable ::-webkit-scrollbar-thumb {
  width: 15px;
  height: 15px;
  border-radius: 15px;
  background-color: #7b7d7f;
}

width will increase the thickness of vertical scroll bar

height will increase the thickness of horizontal scroll bar.

Screenshot without additional css

Screenshot with additional css

Live application example ( hover on the application to view scroll bar ) :

Link to view application in new tab – https://khalil232.com/apps/ojet-apps/?ojr=thick-scrollbar

To show loading spinner in VBCS

Users can add the following html code in designer to add a loading spinner in vbcs.

On button click they can call component ( #loading-dialog ) and select open method.

Now loading dialog is shown, they do some action and after action is completed, they can call component ( #loading-dialog ) and select close method.

Code for loading dialog

<oj-dialog dialog-title="Loading" id="loading-dialog" cancel-behavior="none" class="">
    <div slot="body">
        <div class="oj-flex oj-sm-justify-content-center">
            <oj-progress-circle size="md" value="-1"></oj-progress-circle>
        </div>
    </div>
    <div slot="footer">
    </div>
</oj-dialog>

View live example in new page – https://khalil232.com/apps/ojet-apps/?ojr=loading-dialog

Commonly used Buttons in VBCS

Button is element for user to interact. On button click we can call some rest API or show some message.

<oj-button label="Download" >
</oj-button>

Link for viewing the buttons code with styles – https://khalil232.com/apps/ojet-apps/?ojr=button

Here are few buttons which I regularly use

Code for button with icon

<oj-button label="Download" >
    <span class="oj-ux-ico-download" slot="startIcon"></span>
</oj-button>

Toolbar buttons Add row, Edit Row, Delete Row buttons ( generally used above a table or for each loop )

<div class="oj-flex">
  <oj-toolbar chroming="solid" class="oj-flex-item oj-sm-12 oj-md-12">
    <oj-button label="Add" class="oj-button-sm">
      <span class="oj-ux-ico-plus" slot="startIcon"></span>
    </oj-button>
    <oj-button label="Edit" class="oj-button-sm">
      <span class="oj-ux-ico-edit" slot="startIcon"></span>
    </oj-button>
    <oj-button label="Delete" class="oj-button-sm">
      <span class="oj-ux-ico-trash" slot="startIcon"></span>
    </oj-button>
  </oj-toolbar>
</div>

Save and cancel button in dialog box

<oj-dialog dialog-title="Dialog" id="add-dialog" initial-visibility="show">
  <div slot="body">
    <div class="oj-flex">
      <div class="oj-flex-item oj-sm-12 oj-md-12">
        <oj-form-layout>
          <oj-input-text label-hint="Text"></oj-input-text>
        </oj-form-layout>
      </div>
    </div>
  </div>
  <div slot="footer">
    <oj-button label="Save" class="oj-button-sm" chroming="callToAction">
      <span class="oj-ux-ico-save" slot="startIcon"></span>
    </oj-button>
    <oj-button label="Cancel" class="oj-button-sm">
      <span class="oj-ux-ico-close" slot="startIcon"></span>
    </oj-button>
  </div>
</oj-dialog>

Close button ( for message only dialog box )

<oj-dialog dialog-title="Dialog" id="add-dialog" initial-visibility="show">
  <div slot="body">
    <div class="oj-flex">
      <div class="oj-flex-item oj-sm-12 oj-md-12">
        Form Submitted successfully.
      </div>
    </div>
  </div>
  <div slot="footer">
    <oj-button label="Close" class="oj-button-sm">
      <span class="oj-ux-ico-close" slot="startIcon"></span>
    </oj-button>
  </div>
</oj-dialog>

Inline action items of table ( to provide inline edit or inline delete or to view more details )

<div class="oj-flex">
  <oj-table scroll-policy="loadMoreOnScroll" class="oj-flex-item oj-sm-12 oj-md-12"
    data="[[$variables.employeeListSDP]]"
    columns='[{"headerText":"Id","field":"id"},{"headerText":"empNumber","field":"empNumber"},{"headerText":"empName","field":"empName"},{"headerText":"Action","field":"","template":"Action"}]'>
    <template slot="Action">
      <oj-button label="Edit" class="oj-button-sm">
        <span class="oj-ux-ico-edit" slot="startIcon"></span>
      </oj-button>
      <oj-button label="Delete" class="oj-button-sm">
        <span class="oj-ux-ico-trash" slot="startIcon"></span>
      </oj-button>
    </template>
  </oj-table>
</div>

For inline navigation to a different page give link instead of button

<div class="oj-flex">
  <oj-table scroll-policy="loadMoreOnScroll" class="oj-flex-item oj-sm-12 oj-md-12"
    data="[[$variables.employeeListSDP]]"
    columns='[{"headerText":"Id","field":"id"},{"headerText":"empNumber","field":"empNumber"},{"headerText":"empName","field":"empName"},{"headerText":"departmentNumber","field":"departmentNumber"},{"headerText":"departmentNumberObject","template":"department"}]'>
    <template slot="department">
      <oj-bind-if test="[[ $current.row.departmentNumberObject.count > 0 ]]">
        <a target="_blank" class="oj-link">
          <oj-bind-text value="[[$current.row.departmentNumberObject.items[0].name]]"></oj-bind-text>
        </a>
      </oj-bind-if>
    </template>
  </oj-table>
</div>

In Form Save Cancel buttons ( Don’t give reset here ) as forms could be long and accidently clicking will remove all data

<div class="oj-flex">
  <div class="oj-flex-item oj-sm-12 oj-md-4">
    <oj-form-layout class="oj-formlayout-full-width" direction="row" label-edge="inside" columns="2"   label-width="45%" user-assistance-density="compact">
      <oj-label-value colspan="2" label-edge="start">
        <oj-label for="name-input" slot="label">Name</oj-label>
        <oj-input-text id="name-input" slot="value" ></oj-input-text>
      </oj-label-value>
      <oj-label-value colspan="2" label-edge="start">
        <oj-label for="city-input" slot="label">City</oj-label>
        <oj-input-text id="city-input" slot="value" "></oj-input-text>
      </oj-label-value>
      <oj-button label="Save" class="oj-button-sm oj-button-full-width">
        <span class="oj-ux-ico-save" slot="startIcon"></span>
      </oj-button>
      <oj-button label="Cancel" class="oj-button-sm oj-button-full-width">
        <span class="oj-ux-ico-close" slot="startIcon"></span>
      </oj-button>
    </oj-form-layout>
  </div>
</div>

In Search ( Search, Reset, Cancel ) ( Reset should reset the form to how it is shown on page load )

<div class="oj-flex">
  <div class="oj-flex-item oj-sm-12 oj-md-4">
    <oj-form-layout class="oj-formlayout-full-width" direction="row" label-edge="inside"
      user-assistance-density="compact">
      <oj-label-value label-edge="start" label-width="35%">
        <oj-label for="name-input" slot="label">Name</oj-label>
        <oj-input-text id="name-input" slot="value"></oj-input-text>
      </oj-label-value>
      <oj-label-value label-edge="start" label-width="35%">
        <oj-label for="city-input" slot="label">City
        </oj-label>
        <oj-input-text id="city-input" slot="value" "></oj-input-text>
      </oj-label-value>
      <oj-button label=" Search" class="oj-button-sm" chroming="callToAction">
        <span class="oj-ux-ico-search" slot="startIcon"></span>
      </oj-button>
      <oj-button label="Reset" class="oj-button-sm">
        <span class="oj-ux-ico-reset-variable" slot="startIcon"></span>
      </oj-button>
    </oj-form-layout>
  </div>
</div>

Commonly used buttons and icons

Download - <span class="oj-ux-ico-download" ></span>
Submit -  <span class="oj-ux-ico-check" ></span>
Save  -  <span class="oj-ux-ico-save" ></span>
Reset  -  <span class="oj-ux-ico-reset-variable" ></span>
Clear -  <span class="oj-ux-ico-close" ></span>
Add  -  <span class="oj-ux-ico-plus" ></span>
Edit  -  <span class="oj-ux-ico-edit" ></span>
Delete -  <span class="oj-ux-ico-trash" ></span>
Upload -  <span class="oj-ux-ico-upload" ></span>
View -  <span class="oj-ux-ico-view" ></span>

Link for VBCS icons – https://static.oracle.com/cdn/fnd/gallery/2401.0.0/images/preview/index.html

How to download business object data as csv file in Visual Builder Cloud Service ( VBCS )

  1. Configure business object ( Ex: Country )
  2. Load data into business object
  3. Add a download button.
  4. On button click call rest API to fetch all data in business object using action chain.
  5. Create CSV content as blob
  6. Download blob file using JavaScript function

Sample BO data

IdCountry NameCountry Short Code
21AfghanistanAF
22AlbaniaAL
23AlgeriaDZ
24American SamoaAS
25AndorraAD
26AngolaAO
27AnguillaAI

HTML Code for button

<oj-button label="Download" on-oj-action="[[$listeners.buttonAction]]">
    <span class="oj-ux-ico-download" slot="startIcon"></span>
</oj-button>

Action chain code for calling Javascript function

{
  "description": "",
  "root": "callFunctionDownloadDataFromBO",
  "actions": {
    "callFunctionDownloadDataFromBO": {
      "module": "vb/action/builtin/callModuleFunctionAction",
      "parameters": {
        "module": "[[ $functions ]]",
        "functionName": "downloadDataFromBO"
      }
    }
  },
  "variables": {}
}

JavaScript function code to call business object rest API and download as csv

define(['vb/helpers/rest'], (Rest) => {
  'use strict';

  class PageModule {

    getLineItems(prevItems) {

      if (prevItems == undefined || prevItems == null) {
        prevItems = [];
      }

      let endpointurl = "businessObjects/getall_Country";
      let queryString = "id is not null";

      var pageModuleVar = this;
      return new Promise(function (resolve, reject) {

        var ep = Rest.get(endpointurl);
        ep.parameters({ 
        "q": queryString, 
        "onlyData": true, 
        limit: 500, 
        offset: prevItems.length,
        "orderBy": "id:asc"
         });
        ep.fetch().then(function (result) {
          if (result.response.ok) {
            var currentItems = prevItems.concat(result.body.items);
            if (result.body.hasMore == true) {
              resolve(pageModuleVar.getLineItems(currentItems));
            }
            else {
              resolve(currentItems);
            }
          }
          else {
            resolve([]);
          }
        });

      });
    }

    async downloadDataFromBO() {
      let lineItems = [];
      lineItems = await this.getLineItems(lineItems);

      let fieldNames = [
        {
          "display": "Id",
          "fieldName": "id"
        }, {
          "display": "Country Name",
          "fieldName": "countryName"
        }, {
          "display": "Country Code",
          "fieldName": "countryShortCode"
        }
      ];

      let headerLine = fieldNames.map(function (fieldObj) {
        return fieldObj.display;
      }).join(",");

      let csvData = headerLine;

      for (let i = 0; i < lineItems.length; i++) {
        csvData += "\r\n";

        let csvRow = "";

        for (let j = 0; j < fieldNames.length; j++) {
          csvRow += '"' + lineItems[i][fieldNames[j].fieldName] + '"' + ",";
        }

        csvData += csvRow;
      }

      const blob = new Blob([csvData], { type: 'text/csv' });
      const url = window.URL.createObjectURL(blob);
      const a = document.createElement('a');

      a.setAttribute('href', url);
      a.setAttribute('download', 'download.csv');
      a.click();
    }
  }

  return PageModule;
});